OTA updates
OTA (Over-The-Air) feature allows flashing new applications using a WiFi connection, by downloading the application binary from a remote HTTP server.
OTA update methods
There are 2 methods to update your application:
- Let the user provide the URL of the updated application. This method is easier to set up, but less secure, as the user can potentially install any application, unrelated to the particular hardware, malicious or disfunctional. We recommend using this method only for debugging.
- Have ESP32M check for updates automatically and install new versions. We recommend using this method for production builds. This method requires a JSON configuration file on the server that describes available versions of your application.
Setting up automatic checking for updates
- Set the name and version of your application in the file
CMakeLists.txtat the top of your project directory:
...
set(PROJECT_VER "1.1.0")
project(my-app)
The version must contain 3 positive integers separated by two dots. The first two are the major and minor version numbers, and the third one is the patch or build number.
- Set the following configuration options in
sdkconfigor viaidf.py menuconfig:
CONFIG_ESP32M_NET_OTA_CHECK_FOR_UPDATES=yCONFIG_ESP32M_NET_OTA_VENDOR_URL="https://your_server.com/<folder_with_updates>"CONFIG_ESP32M_NET_OTA_CHECK_INTERVAL=XX, whereXXis how often to check for updates (minutes)CONFIG_ESP32M_NET_OTA_VENDOR_ONLY=yif you don't want to allow users to install arbitrary binary files (default). If this option is not set, the user will be able to provide any URL and install any firmware.
- Upload the
<my-app>.jsonfile to the/<folder_with_updates>on your server. The name of this file must match the name of the application (as configured with theproject()command in theCMakeLists.txt). The format of the file is as follows:
{ "firmware": { "1.1.2": "path/to/app.bin" } }
The file describes versions of the application available on the server. The path to the application binary is relative to the .json file.
- Upload the application binary to the server so it can be downloaded at
https://your_server.com/<folder_with_updates>/path/to/app.bin
Setting up the HTTP server
Use any HTTP server of your choice (for example, Nginx). The server must allow binary file downloads and must be accessible to your ESP32 device either by IP or by DNS name. It is advisable to set up TLS encryption (https:// protocol), especially if you plan to update your application over the Internet, to enforce the integrity of your application. One of the easiest ways to set up a free TLS certificate is by using a Certbot.
Setting up OTA client
OTA module must be included and initialized in your project, like this:
#include <esp32m/net/ota.hpp>
at the start of your main.cpp, and
net::useOta();
in the void app_main()
Partition table considerations
The OTA update process is a native ESP-IDF feature explained in detail in this article. In short, ESP-IDF maintains at least two separate slots of the same size in the partition table (ota_0 and ota_1), of which one is currently running the application, and the other one is used to download a new application. If the download process is successful and all integrity checks are OK, the second partition becomes active, while the first one will accept the application binary on the next update, and so on. This approach allows to survive incomplete or broken updates but requires twice as much flash memory. Therefore ESP32 module with 4MB SPI flash will allow for an application size of a little less than 2MB. If you want to use OTA with a bigger application or need flash space for other purposes, consider the ESP32 module with an 8MB or 16MB flash chip.
Updating the application using arbitrary URL
This method is available if automatic checking for updates is not configured, or if CONFIG_ESP32M_NET_OTA_VENDOR_ONLY is not set in sdkconfig
From the User Interface
Click on the System link in the sidebar menu and enter the application URL in the Administration box, then click Update:
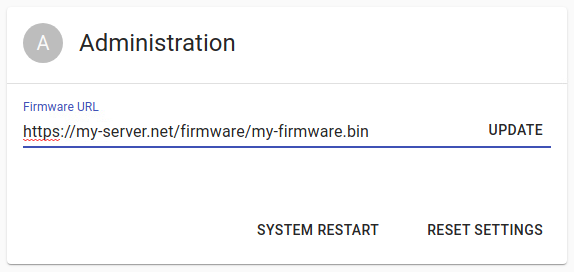
If the progress bar appears in a few seconds - the update process has started, and must not be interrupted until finished. You will not be able to use the device during the update process. When the update is finished, the MCU will reboot automatically and should become accessible again within a few seconds. If the progress bar doesn't appear for a long time (over 20 seconds), it usually means that the MCU cannot download the application binary for some reason. Check the URL, make sure that you can download application from a browser and check if your firewall blocks the MCU. You can also set up Remote logging to check for extended error/warning messages.
Using the WebSockets API
Establish WebSockets connection with your ESP32 and send this message to start application update:
{
  "type": "request",
  "target": "ota",
  "name": "update",
  "data": { "url": "https://my-server.net/firmware/my-firmware.bin" }
}
See details on WebSockets API
Using the MQTT API
Send the message
{ "url": "https://my-server.net/firmware/my-firmware.bin" }
to the target esp32m/request/project_name/ota/update (replace project_name with the name of your project)
See details on MQTT API